OpenAI Assistants API: How to create your own AI assistant with or without code
It's now easier than ever to create your own AI Assistant that can handle a lot of computing tasks for you. See how you can get started with the OpenAI AI Assistant API.

New updates on 17th of April 2024 from OpenAI
OpenAI announced significant updates to the Assistants API. The update includes enhancements aimed at improving the capabilities and performance of the assistants.
- Knowledge retrieval now supports up to 10,000 files.
- More control over token and model configuration.
- Streaming support.
You can read about the latest update on the official website here.
It's been a few days since OpenAI's DevDay and lots of interesting features and updates have been announced. Today, we're specifically interested in the new AI Assistant feature. So without further ado, let's get started!
"You just ask the computer for what you need, and it'll do all of these tasks for you." - Sam Altman - CEO, OpenAI
AI Assistants
An AI Assistant performs actions based on a given set of instructions and tools. You can think of an AI Assistant as a digital assistant (or agent) that you hire to solve specific problems for your use case.
AI Assistants are hosted within the OpenAI platform and use a chosen large language model to think, communicate, and take action.
We're going to see how to create an AI Assistant that reads a PDF file and converts it to a Twitter thread.
We'll call it X Threads Converter.

How do I create an AI Assistant?
There are two ways to do this:
- Using the OpenAI Web Interface
- Using the OpenAI Assistants API
Method 1: Using the OpenAI Web Interface
For this method, we do not need to write any code since everything will be done using the Web Interface provided by the OpenAI platform.
Let's go ahead and create our X Threads Converter AI Assistant using the Web Interface. Follow the steps below:
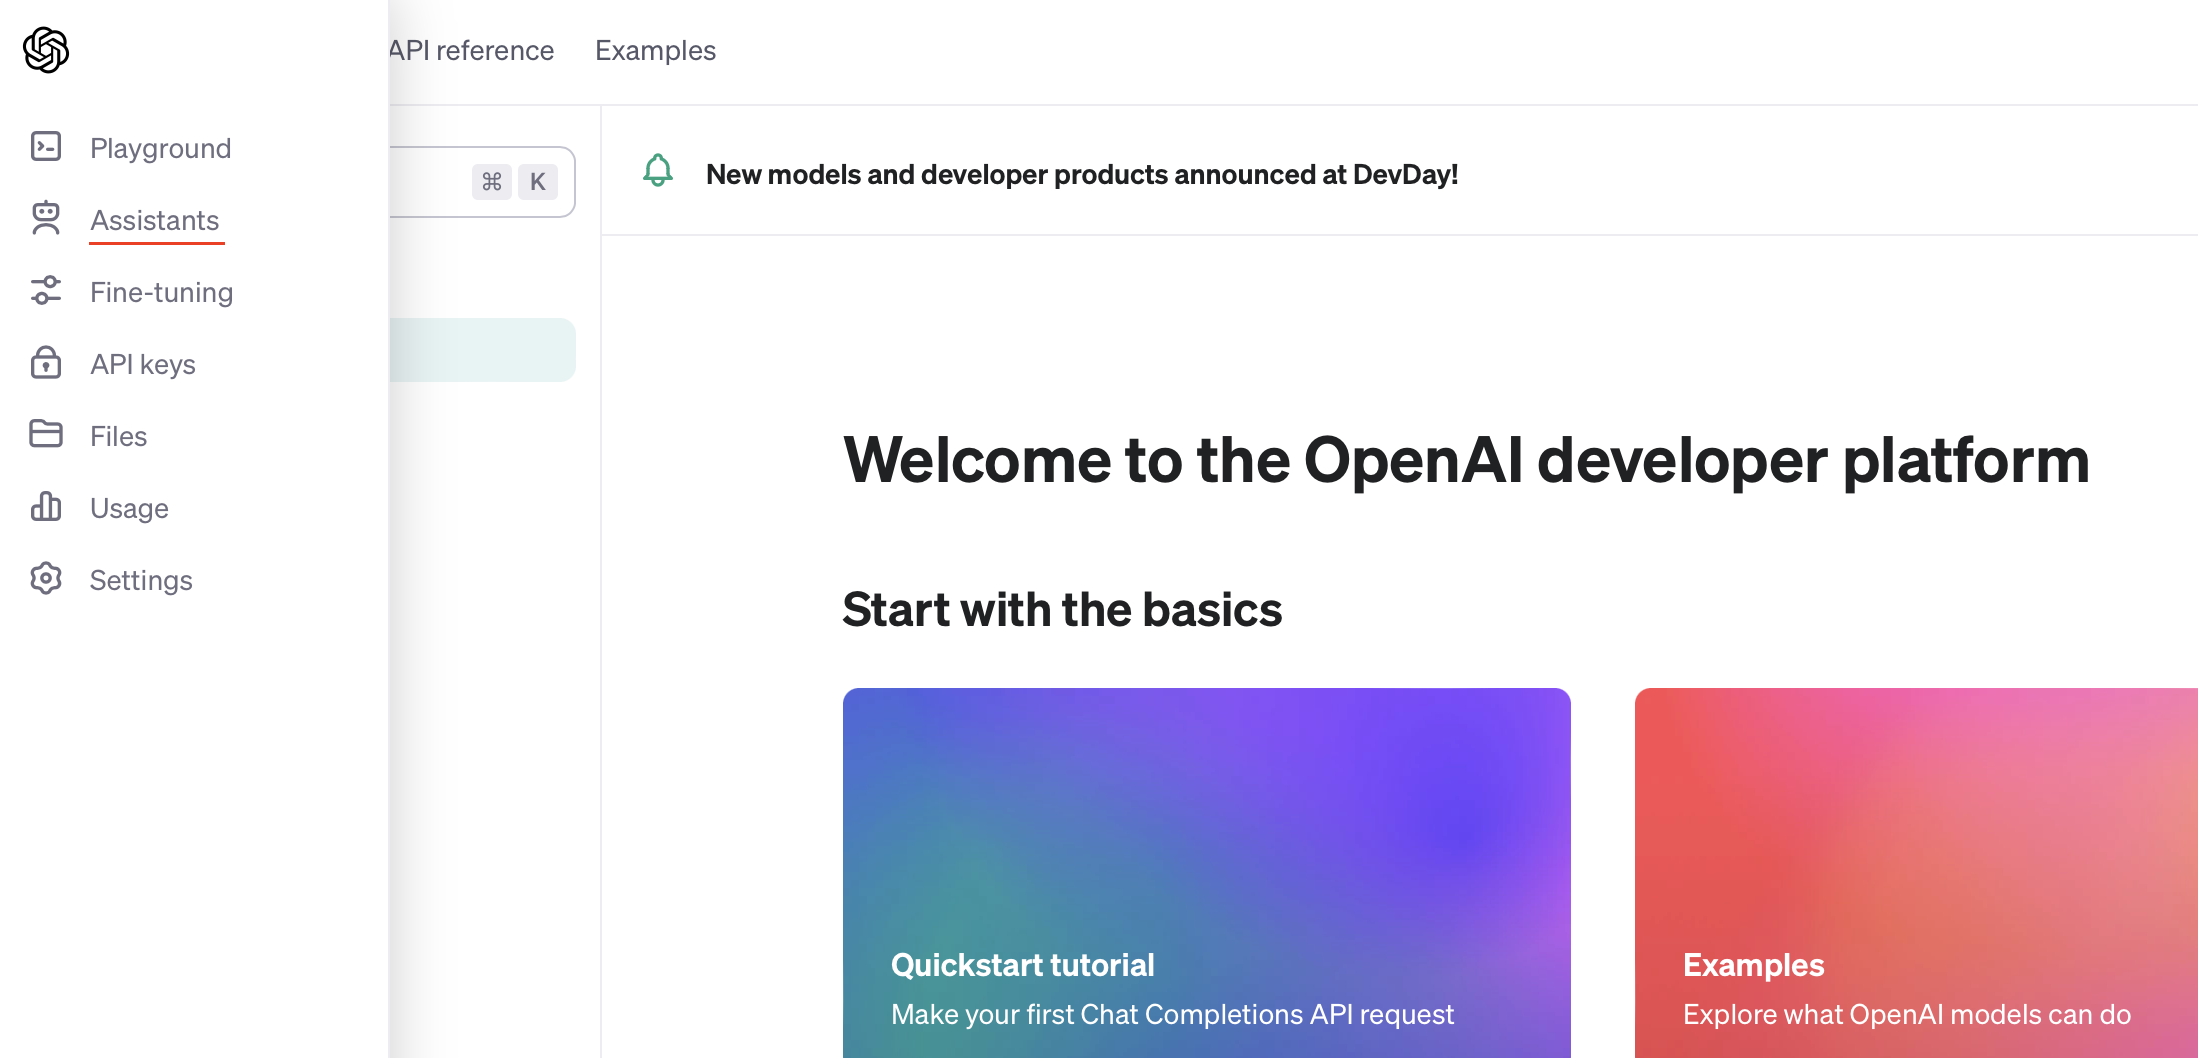
Step 1: Log into your OpenAI account.
Step 2: On the left side navigation bar, you'll see the new Assistants tab:
Step 3: Click on the Assistants tab:
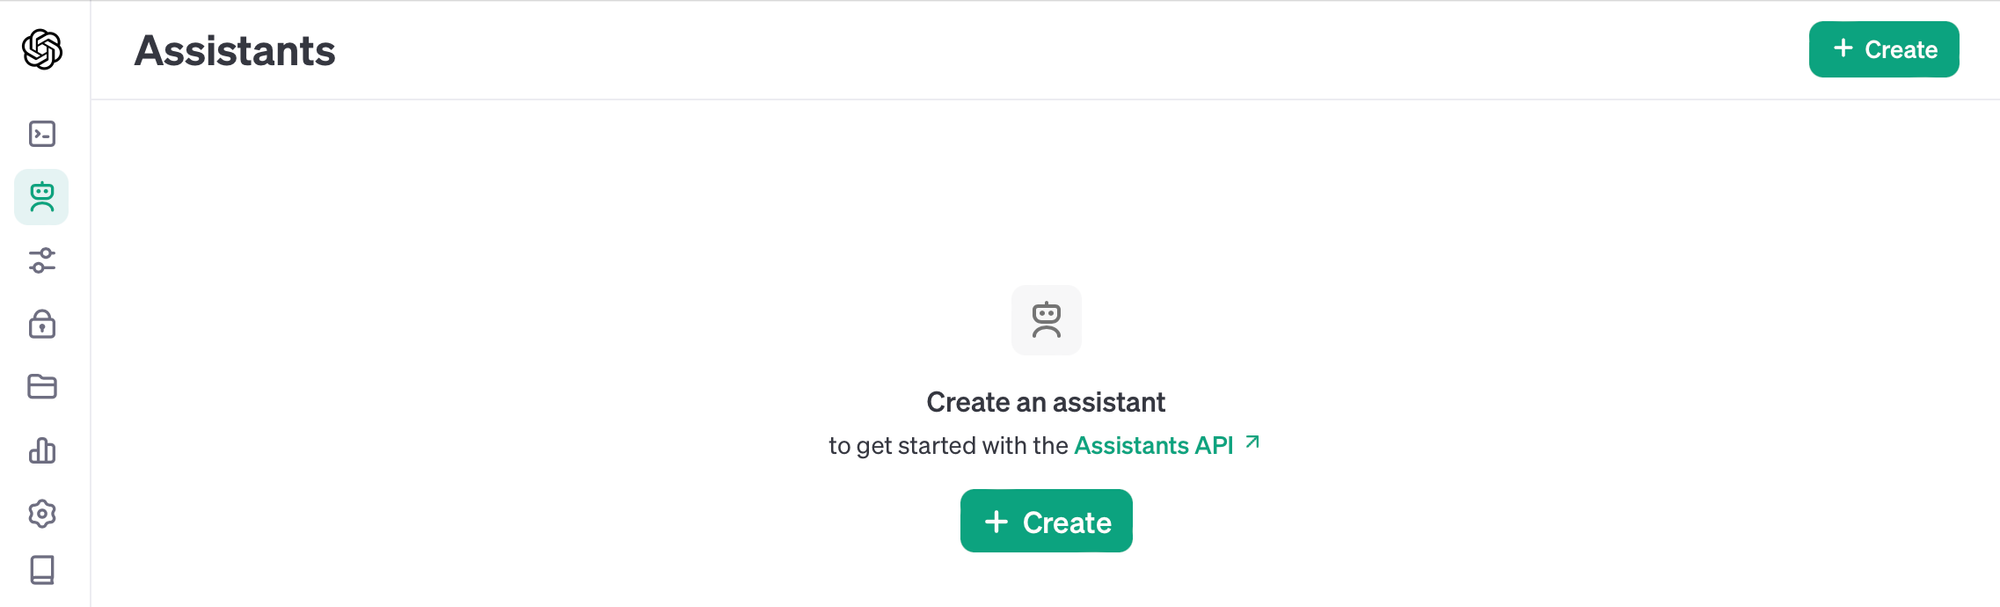
As you can see, I don't have any assistants yet. We're going to create a new one.
Step 4: Click on Create. You'll see the following options:
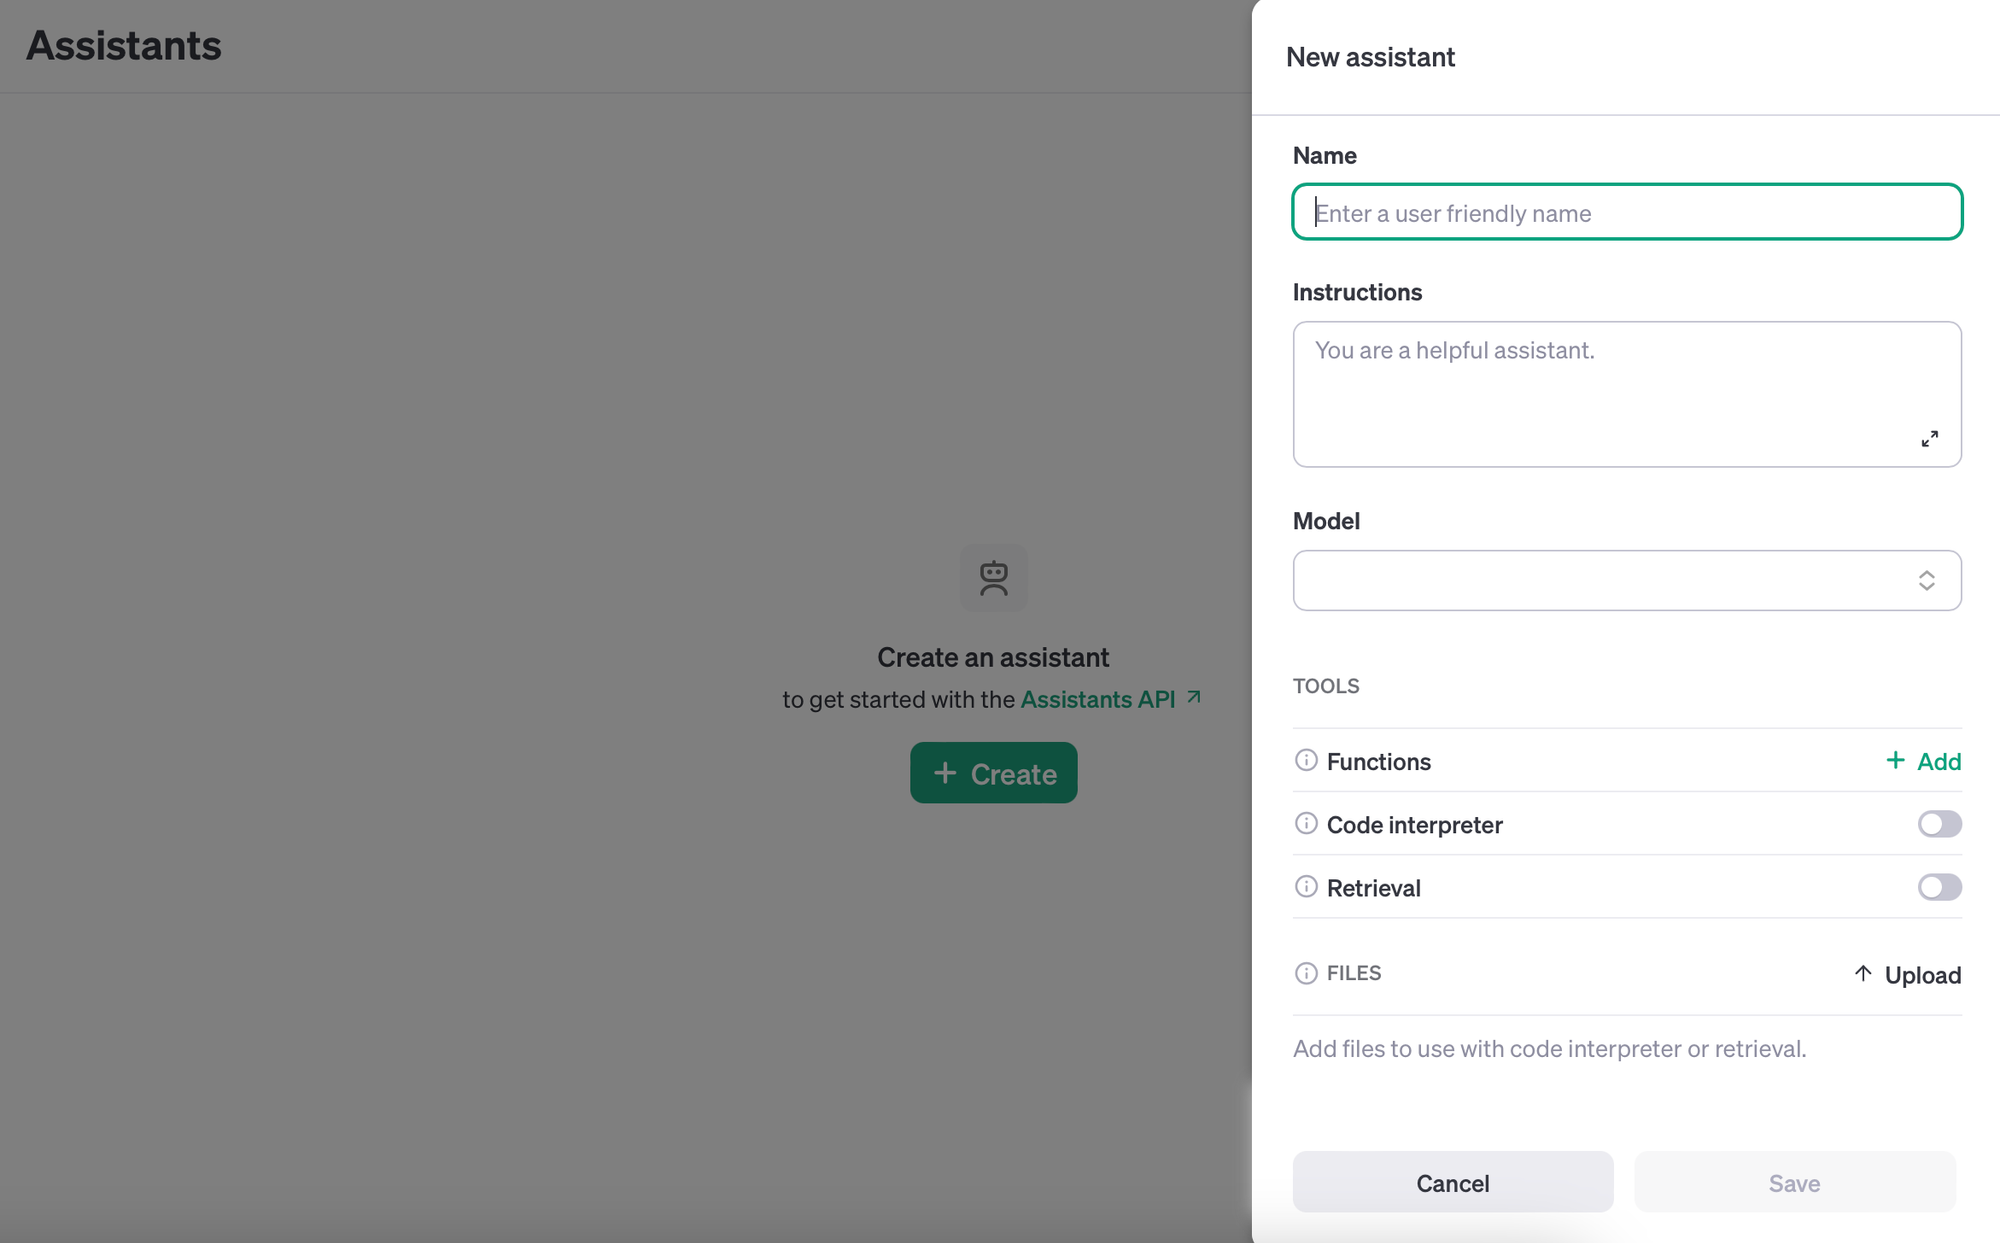
To create a new assistant, we'll need to enter the following:
- Name: Let's call it
X Threads Converter. - Instructions: Use the following instructions: "You are a helpful assistant. Given a set of files, you extract the most interesting information and restructure it into Threads format for Twitter."
- Model: Select one of the supported OpenAI models. I will choose the new
gpt-4-1106-previewmodel. - Tools: We're just going to enable
Retrievalfor this example. This is because our assistant will need to retrieve the contents from the uploaded files.- I recently published a full hands-on tutorial covering the
Function Callingtool, you can read more by following this link.
- I recently published a full hands-on tutorial covering the
- Files: You can upload any supported file here. I uploaded a PDF version of this post. If you want to do the same, just open the link in your browser and save it as PDF.
Step 5: Click on Save. Your configuration should look like this:
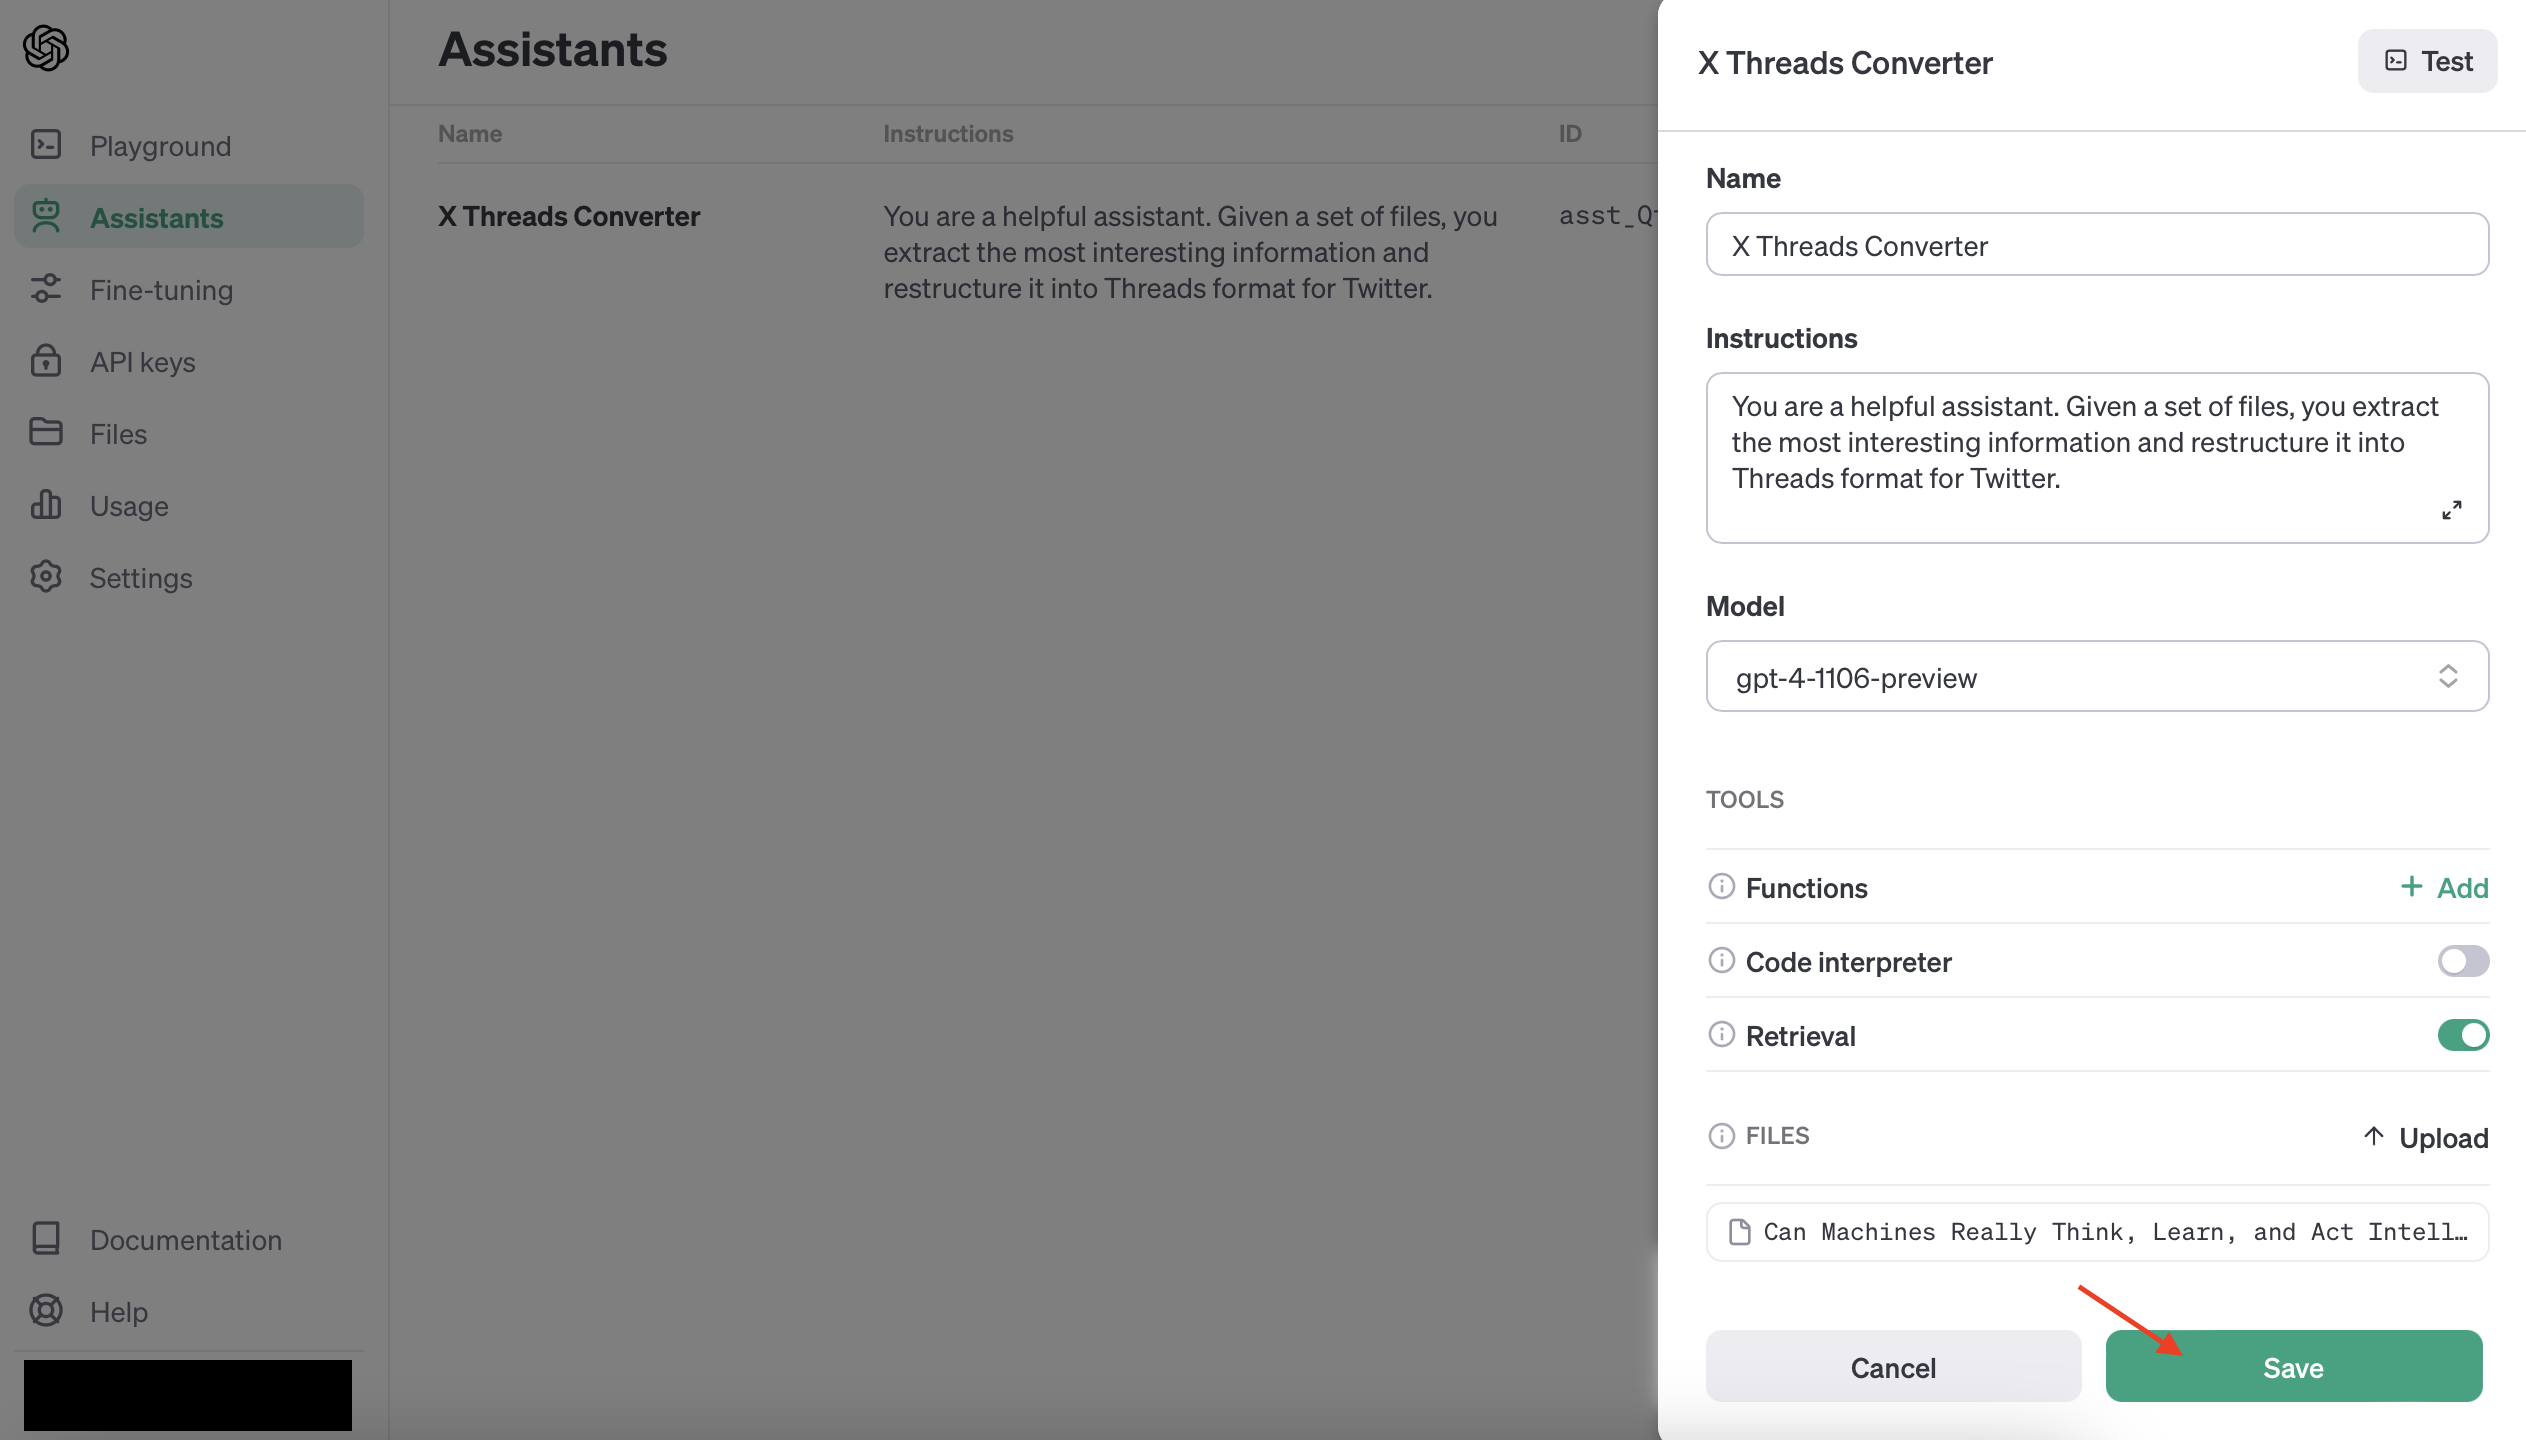
That's it! Go ahead and click on the Save button. Our X Threads Converter will be ready in a few seconds.
Step 6: Try it out in the Playground:
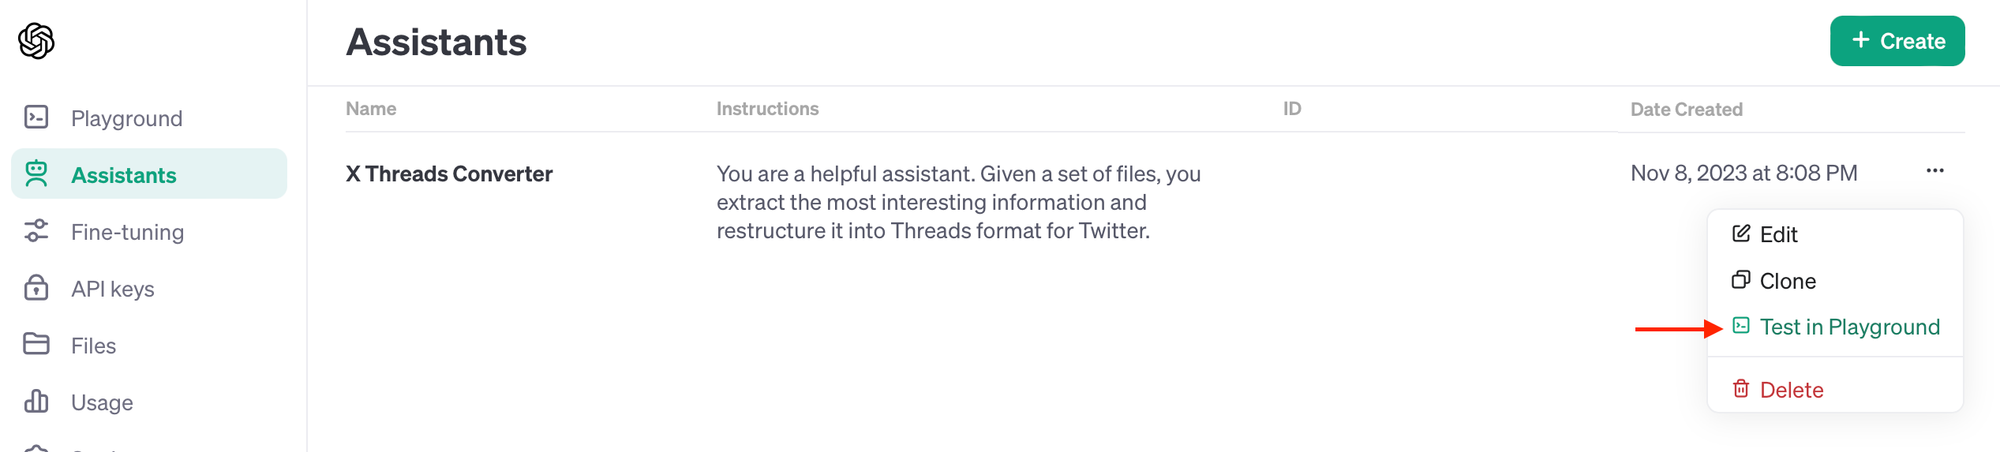
Click on the "Test in Playground" button. The Playground is a chat interface where you can test and optimize your Assistant.
Let's ask our shiny new assistant to "Create the X Threads Post" click "Add and run" and see what happens.

The AI Assistant will take a few seconds to think and process your request.
Behind the scenes, the following is happening:
- The contents of the PDF are converted to Vector Embeddings
- Our Vector Embeddings are stored in a Vector Database
- The Query is used to find relevant and similar embeddings
- The relevant parts are sent to the chosen large language model
- The LLM will process and return the final output
You should end up with something like this:
X Threads Converter
Based on the text extracted from the uploaded PDF, I will create a Twitter thread format for you. However, due to the length limitations of Twitter posts (280 characters each), the thread will summarize the content in concise tweets.
Here is how a Twitter thread could look with the provided content:
1/ "Can machines think, learn, and act intelligently? Let's define machine learning and explore the history of intelligent machines. 🤖 #AI #MachineLearning"
2/ "Despite the myriad of introductory posts on AI, I bring you something unique and engaging, complete with an awesome quiz! 🎓 #Education #TechFun"
3/ "Starting with the basics: What's the big picture of Artificial Intelligence and Machine Learning? Let's simplify the buzzwords! #BigPictureAI"
4/ "From the origins to the present, understanding AI/ML can be challenging. But don't worry, we're breaking down the essentials for beginners. #AIML101"
5/ "If you're finding this thread interesting and enlightening, wait till you try the quiz! And don't forget, subscribe if you enjoy it! #AIQuiz"
Method 2: Using the OpenAI Assistants API
Let's go ahead and create our X Threads Converter AI Assistant using the OpenAI Assistants API:
Step 1: Install the Official OpenAI Python SDK
In your terminal, type the below and hit return:
pip install openaiUse pip to install the official OpenAI Python SDK
To verify that the OpenAI SDK has been successfully installed, run the following command:
pip show openaiVerify the installed version of OpenAI Python SDK
Step 2: Import Required Packages
Great, now we can create a new directory for our project. In your terminal type the following commands:
- Create a new directory:
mkdir openai-ai-assistant-demo cdinto the new directory and createassistant.pyfile:cd openai-ai-assistant-demo && touch assistant.py- Open the
assistant.pyfile and import theOpenAI SDK
from openai import OpenAIStep 3: Create the OpenAI Client
We'll now create the OpenAI client. Make sure to replace with your own OpenAI API Key.
client = OpenAI(
    api_key="YOUR_API_KEY",
)
Step 4: Prepare the PDF File for Upload
Next, place the PDF file in the openai-ai-assistant-demo directory. In my case, the file name is document.pdf.
Let's create the file using the OpenAI SDK using client.files.create:
file = client.files.create(
  file=open("document.pdf", "rb"),
  purpose='assistants'
)

file_id = file.id
Here, we specify the purpose property as 'assistants' so that the file becomes accessible by the Assistants API.
Step 5: Define the Required AI Assistant Tools
We create our tools variable which is a list of required tools that the AI Assistant will have access to. In this case, we only need the retrieval tool.
tools = [
    {
        "type": "retrieval"
    }
]
Step 6: Create our AI Assistant using client.beta.assistants.create:
Finally, we'll use the client.beta.assistants.create and pass the following parameters:
assistant = client.beta.assistants.create(
    name="X Threads Converter",
    instructions="You are a helpful assistant. Given a set of files, you extract the most interesting information and restructure it into Threads format for Twitter.",
    model="gpt-4-1106-preview",
    tools=tools,
    file_ids=[file.id]
)

assistant_id = assistant.idStep 7: Run the Code
To create our X Threads Converter AI Assistant, execute the assistant.py file:
python assistant.py
Run the assistant.py code
Once done, refresh the Assistants page and we can see our new X Threads Converter AI Assistant in the Assistants list.

X Threads Converter AI Assistant created using Assistants APIEasy. Right?
How do I Use an AI Assistant?
The Playground provided by OpenAI is a great tool to test our AI Assistant quickly. But, how do you actually use the AI Assistant using the API?
Let's explore how AI Assistants work and go over two important concepts: Threads and Runs.
What are Threads?
Each thread represents a conversation. A thread contains a list of messages each belonging to the user and the large language model.
The task we want to send to our assistant: "Create the X Threads Post." is represented as a message within a thread.
What are Runs?
A Run represents the execution of a thread. A Run also needs to know which AI Assistant to use for that execution. Once initialized, the Run will determine which steps are needed to complete the task.
To create a run we'll need to supply the thread_id and assistant_id parameters.
Creating a Thread
To create a Thread, we'll need to initialize it with a list of messages. For our example, there's only one message, which is: "Create the X Threads Post.".
id property is accessible after you initialize the file object in Step 4 by calling file.id.Let's create our thread using client.beta.threads.create:
thread = client.beta.threads.create(
  messages=[
    {
      "role": "user",
      "content": "Create the X Thread Post.",
      "file_ids": [file_id]
    }
  ]
)

thread_id = thread.id
We'll need the thread_id property below when creating the Run.
Creating a Run
Let's create our Run using the client.beta.threads.runs.create method:
run = client.beta.threads.runs.create(
  thread_id=thread_id,
  assistant_id=assistant_id
)

run_id = run.id
The assistant_id could be retrieved from this page or accessed using the id property after the assistant variable is created in Step 6.
client.beta.assistants.list method. Refer to the official docs for more on the API reference.Checking Run Status
Our run will take a few seconds to complete. This is because the AI Assistant needs to determine the steps needed to complete the task. It also needs to process, store, and retrieve information from the PDF file and talk to the LLM for further processing.
When using other tools such as the code_interpreter the Run may take even more time as it generates and runs Python code iteratively.
Therefore, we'll need to periodically check if the Run is completed. We can do this by checking its status property by calling the client.beta.threads.runs.retrieve method, as shown below:
run = client.beta.threads.runs.retrieve(
  thread_id=thread_id,
  run_id=run_id
)
Once the status property changes to completed, we can see the model's response by retrieving the messages within our thread:
thread_messages = client.beta.threads.messages.list(thread_id)
print(thread_messages.data)
That's it! Feel free to play around with the code (at the end of the post) until you get the needed output from your AI Assistant.
Closing thoughts
As we've seen, this should get you up and running with the new OpenAI AI Assistants in no time. It is now easier than ever to create your AI Assistant that can help you perform a variety of tasks useful to your business.
How will this affect existing high-level frameworks and tools such as LangChain and LlamaIndex? It's too early to tell, but probably not much. That's another reason why you should stay tuned to stay up to date.
Pricing considerations
It is essential to consider the cost of the AI Assistants service before deciding to integrate it into your product.
You will be charged based on the number of tokens used depending on the chosen model. Tools such as the Code interpreter and Retrieval will also incur charges as detailed below:
| Tool | Input |
|---|---|
| Code interpreter | $0.03 / session (free until 11/17/2023) |
| Retrieval | $0.20 / GB / assistant / day (free until 11/17/2023) |
For an up-to-date pricing list, see this page.
Other considerations
You may also want to think about the fact that your application will be locked into the OpenAI platform. This means that if you decide to migrate to another LLM, storage, and vector database at a later time it may not be a simple task.
Enjoyed this post? Please subscribe and follow me on X for more updates.
Thanks for reading!
Further readings
More from Getting Started with AI
Source code for the geek in you ❤️
Here's the full code (including added logic and logs). I modified it to check and use an existing AI Assistant and file instead of creating them every time.